ICS ICAR-MRS Tactical Rifle 01
When we first got our hands on the ICS Galil ARM we were impressed with the quality of the build and materials used, especially the wooden handguard. So when I heard that ICS is releasing a Tactical Rifle variant of the Galil, I was a bit sceptical as I have always envisioned the Galil as an old, historic rifle with wood and metal alone. No fancy bits, simply “Old School.” So a tactical variant seemed very odd and I have always imagined it not looking very pleasant to the eyes.
It was like déjà vu when I received the ICS Galil ICAR-MRS. It came in the same packaging as the old Galil ARM. I am not sure if this is the same box that the rifle will come in when it is properly purchased. I see nothing wrong with this except that the ICAR-MRS is not on the photos printed in the box.
FIRST IMPRESSIONS
When I opened the box, my first thoughts were the same as when I first heard about the release of this AEG, It looks weird. For me these rifles are meant to look like classic not modern. The rifle comes with the usual ICS bundle with a bottle of ICS BBs and two metal hi-cap mags.
Upon lifting the rifle, the first obvious difference from the ARM version is the weight. I find the MRS lighter and easier to manoeuvre than the ARM version. I think this is mainly due to the material used for the modular rail system. Other than that, it is exactly the same as the old ARM version.
WHAT'S DIFFERENT?
Basically, there are some new parts that ICS changed from the old variant to create this MRS version. Let me start with what they changed.
1. First obvious change was the wooden handguard is replaced by a modular rail system. The Gas tube that runs along the top of the wood handguard is now inside the MRS as compared to the original Galil design where the gas tube is exposed. The stick battery simply slips into gas tube which you can do by opening the upper receiver cover and insert the battery. The design of the tactical handguard is good as they were able to incorporate the rail system on all 4 sides of the handguard without making it look awkward.
2. The upper housing or receiver cover has also been replaced by a new one. Similar to the old cover but only this time, they added a top rail that, amazingly, runs continuous with the tactical handguard top rail. At the rear end of the top rail is a miniature flip-up rear sight, which I think could have been made a bit better. I would have preferred ICS to have included a detachable MBUS-style rear sight to make the rifle look more modern.
3. The skeleton type stock is the same as that of the ARM, albeit a little bit shorter than the Galil ARM , but they added a cheek piece. One thing I found difficult with the check piece is that it serves right handed shooters. My son, being a lefty, found this out the hard way when he used the rifle during the Ground Zero National Weekender. He could not get a comfortable shooting position as he can not use the cheek piece. I am not 100% sure if it can be reversed for southpaws but it looks like it can be disassembled.
4. And finally, the old style grip is replaced into a more ergonomically designed tactical grip that is more comfortable to hold.
Doing all of these changes meant that some of the cool features of the old ARM variant has to be removed namely the bi-pod, the folding carry handle and the rear sight. Although the bi-pod can still be installed there is no facility to be able to fold it into the handguard anymore.
Despite all those changes, most features of the ARM variant still exist such as the folding stock and the ambidextrous fire selector.
The internals are unchanged from the originalwhich you can refer to the ICS ICAR ARM version which we previously reviewed. And as I always say, if it works, why change it?
PERFORMANCE
The best feature of the MRS is its weight. It was so light that my 14 year old son was able to run around with it for a whole day of hardcore skirmishing during the National Airsoft Weekender held here in the UK.
The accuracy and range mirrors its original counterpart and the rate of fire is very decent even with a mere 8.4v battery powering its motor.
I am very impressed with how “skirmishable” this AEG is and the versatility that the Rail System adds to it is great giving the user the flexibility of attaching accessories that he needs for any firefight scenario.
A BLEND OF THE OLD AND NEW
As I said in the beginning, I was a quite sceptical when I heard of the release of this MRS variant of the Galil. Gut instinct telling me: “It will not work.” But surprisingly ICS did manage to create a design that works and actually doesn’t look bad. With the MRS, ICS was able to incorporate the modernity of the rail system with the old classic design of the ARM, which now gives it flexibility and ease when adding after market accessories that caters to players who spend a lot of money in “pimping out” their AEGs. This MRS variant will surely rival the Tactical AKs that are out in the market at present and gives an even better choice to players who prefer these types of firearms.
Hats off to ICS for another great design.
HYIP PROGRAM
 ====================================================

Friday, March 30, 2012
Burst Avocado MOSFET Review

The video review of newest MOSFET AEG fire controller in the market. Don't sneer at the fruity name of this product as it can give you a good upgrade for your AEG and giving you the settings that you want when you fire your AEG. This is one of the easiest MOSFETs to install as it does not require any soldering as compared to early MOSFETs. Full text of the video review below:
The video review of newest MOSFET AEG fire controller in the market. Don't sneer at the fruity name of this product as it can give you a good upgrade for your AEG and giving you the settings that you want when you fire your AEG. This is one of the easiest MOSFETs to install as it does not require any soldering as compared to early MOSFETs. Full text of the video review below:
This is the new Burst Avacado fire controller. It's a solid state device that allows you to fire in a 3-round burst like a real steel M4.
PACKAGE
The Burst Avocado comes in a plastic bag with a cardboard packaging. Printed on the back are a list of product features. Inexplicably, it lacks any printed instructions or manual on how to reprogram the burst settings. The QR tag and URL to 6mmproshop.com was a dead link. Fortunately there was a video on Evike.com that explained how to reprogram the unit. But this basic lack of info is unacceptable.
FORM AND FUNCTION
The unit itself is nicely built with a clear acrylic protective box around the circuit board and small Tamiya type connectors common to most AEGs.
Installation is easy, provided your AEG has room in the battery chamber. Some AEGs may require modification. In a front wired M4 or a CA G36C you'll remove the fuse and wiring connected to the gearbox and replace it with the Burst Avocado.
Supposedly, when connected a battery the unit will analyze it, and will give an audible beep when your battery reaches low voltage and cuts off the current. This is really only useful for Lipo batteries which can be seriously damaged by over-draining them. We weren't able to confirm this feature.
Once installed between the battery and gearbox, set your AEG to full auto and when you pull the trigger, it fires a crisp 3-round burst. To program it, set your selector to full-auto and keep the trigger depressed until you hear a beep. Then quickly pull the trigger, the number of times you want it to fire in a burst. Then pull the trigger one more time and hold and wait for the confirmation beep. You can set it from 1 to 12 shots in a burst. Or if you select more than 12, it will fire in a 30 shot burst.
Traditional airsoft MOSFET switches require you to rewire your gearbox to attach a low voltage bypass line to your trigger contacts while a high voltage line goes directly to your motor. The Burst Avocado doesn't require rewiring. But because all the current passes through your trigger contacts, you will eventually burn them out. Sooner, if you use high voltage LiPo batteries.
But the Burst Avocado does offer Active Breaking. It sends a reverse polarity pulse to the motor after each burst, stopping it from over turning and leaving your spring half compressed.
CONCLUSION
The Burst Avocado is the perfect upgrade for those who want the realism of a 3-burst. For those who have upgraded their AEG to sniper rifles and need them fixed in semi-auto. Or for those with full-auto only SAWs who have no way to fire in semi-auto.
Benefits
- Easy install
- Easy to program
- Active Breaking
- Prevents over-fire
Cons
- No voltage bypass
- May not fit all AEGs
ASG CZ 75D Compact CO2

This time, Moondog gets his hands on the Česká Zbrojovka 75 Compact CO2-powered Gas Blowback Pistol which is licensed under ASG. This is a hard hitting compact airsoft pistol, given the nature of its power source. We do not recommend it to be a skirmish pistol in the UK, but can be used in woodland skirmishes in other countries legally.
Video review and the text used in the review for your reference is provided right after it:
HISTORY
This sought after 9mm was developed by Česká Zbrojovka in 1975, hence it's name CZ75. It is the gun of choice of Rally Vincent from Gunsmith Cats and its design was the basis for the Jehrico 941 Baby Eagle.
PACKAGE
The CZ75 comes in a cardboard and styrene box with the gun, magazine, manuals, an adjustment tool and sample BBs. ASG is a Danish sports company which holds the license to produce toy guns with the CZ trademark, with WinGun of Taiwan as their manufacturer. ASG has released a number of CZ75 models. This is the compact variant.
FORM AND FUNCTION
The modernized CZ75 has a tactical rail built into the frame for accessories. Unlike a real gun, the ASG frame is plastic but feels solid and has nice rubber grips. The slide, trigger, hammer and magazine, are full metal.
Mock serial numbers and full CZ trades are etched into the slide though not totally accurate in designl. Nor can the pistol be taken down like real steel. The frame safety lever is functional but the slide lock is fake.
The slide pulls back reveal solid metal and the tiny hop-up adjustment screw near the top. The rear sights are adjustable for windage but not elevation.
It's fair to say this gun is "styled" after the real CZ75 rather than a replica.
The 15-round magazine appears identical to Wingun's G&G 1911 CO2 blowback. Each mag contains the CO2 cartridge and requires a flathead screwdriver tighten. It can be little tricky to load properly. It is easy to over tighten and cause all the gas to dump.
PERFORMANCE
The average FPS was above 390fps with .20g BBs, which makes this unsafe for CQB fields. But this offers you the range of an AEG outdoors, and allows you to use it in colder weather than a green gas gun. I managed 3 reloads on a single CO2 cartridge.
Firing 5 rounds with the pistol bench rested, yielded a 6 inch group from 25ft. with one fly-away which may be due to the hop-up breaking in. Trigger pull was light and the blowback crisp. Overall it felt like firing a green gas blowback.
CONCLUSION
The ASG CZ75 is a solid performing gas blowback pistol that is ideal for outdoor use. It's a step up from the CO2 Jericho and P99 I've previously reviewed. On the downside, it lacks the realistic takedown, detail and build quality of a Tokyo Marui or KSC CZ75. But on the upside, it has twice the effective range of those green gas pistols and it's less than half the price.
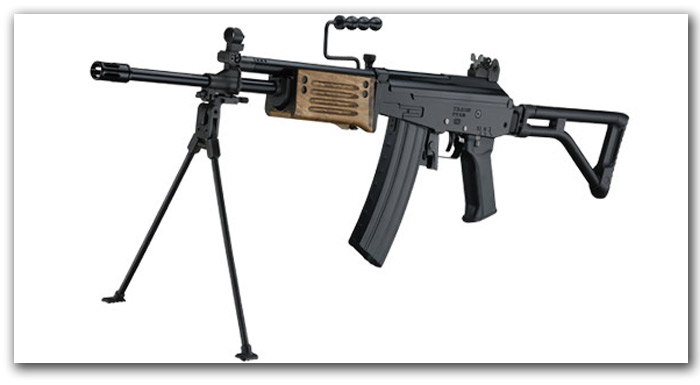
ICS ICAR ARM (Galil ARM)
 01")
The Galil are a series of assault rifle developed in 1967. I find the development of it a bit on the funny side as it is told that during the war, the IDF or Israeli Defence Forces armed with the FN FAL experienced problems with their firearms especially with the weight and durability in fine dust environments. On the other hand, the Arab Army was then armed with the Russian AK 47 seemed to have the advantage. So after the war, the IDF decided to replace the FN FAL and develop a new assault rifle to rival the success of the AK47 but with a touch of their own design.
The design of the Galil was based on the Finish Velmet Rk.62 assault rifle, which is basically an AK47 clone. This new design was eventually selected as the new IDF assault rifle in 1973. IMI or the Israel Military Industries, a state owned company, where the machinery and documentation bought from Valment were transferred. It was even rumoured that the first Galils were made using the original Valment-made receivers. The Galil eventually evolved into several configurations such as the 5.56mm ARM and AR assault rifles, the compact 5.56mm SAR rifle, the 7.62mm NATO AR selective fire and 7.62mm NATO semi-automatic Galatz sniper rifle and the 5.56mm MAR subcompact assault rifle or also known as Micro-Galil.
The ICS ICAR ARM
The last ICS AEG that I reviewed was the ICS L86 and I was literally blown away with the quality of the rifle and with the simplicity of the way it was put together. So when I was told that ICS were sending me the Galil, it got a bit exciting and I became very curious on how this AEG will look like. I have seen the variant of another manufacturer and I was not impressed with it. So when I got home from work and saw the box lying on the floor, I immediately grabbed a knife and started cutting through the packaging. I called up Migh2r to help me out go over the internals and the internal review was done by him.
The first thing that greeted me was the impressive ICS box, which has a real photograph of the two Galil variants, the ICS 91 GALIL-ARM (ICAR ARM) and the ICS 92 GALIL-AR (ICAR AR) although according to this box, there is a third variant available, the ICS 93 GALIL SAR (ICAR SAR). The box also features a carry handle, which I am seeing more and more nowadays, that makes it easier to carry, also there is no immediate need for a gun bag if the budget is needed for something more important. Inside, the rifle is well supported by a molded plastic base. Unlike the other ICS packaging that I have seen, this one does not have the velvety type material covering the support mold. I think this is the reason why the rifle has some minor scratches in some areas.

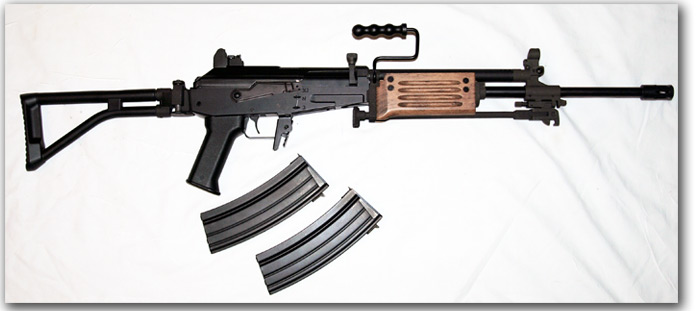
The package includes the rifle in all its glory, two…yes… two hi-cap magazines, a small bottle of ICS BBs, a cleaning rod and a very useful user’s manual.
When I open a new AEG there is always something that strikes you first. For one, I had no idea which variant I was getting. I think is one advantage of being in my position and having stuff sent to me, it’s like opening a Christmas present everytime I open a new review item. With the ICS Galil ARM, the first thing that caught my attention was the handguard. It was a very iconic feature of rifles of this type. For me rifles like the Galil and the AK will not look authentic if they do not have any real wood furnitures. And for the ICS Galil ARM, the wooden hanguard is very beautiful. It is also very authentic looking and sort of has that old worn out effect.
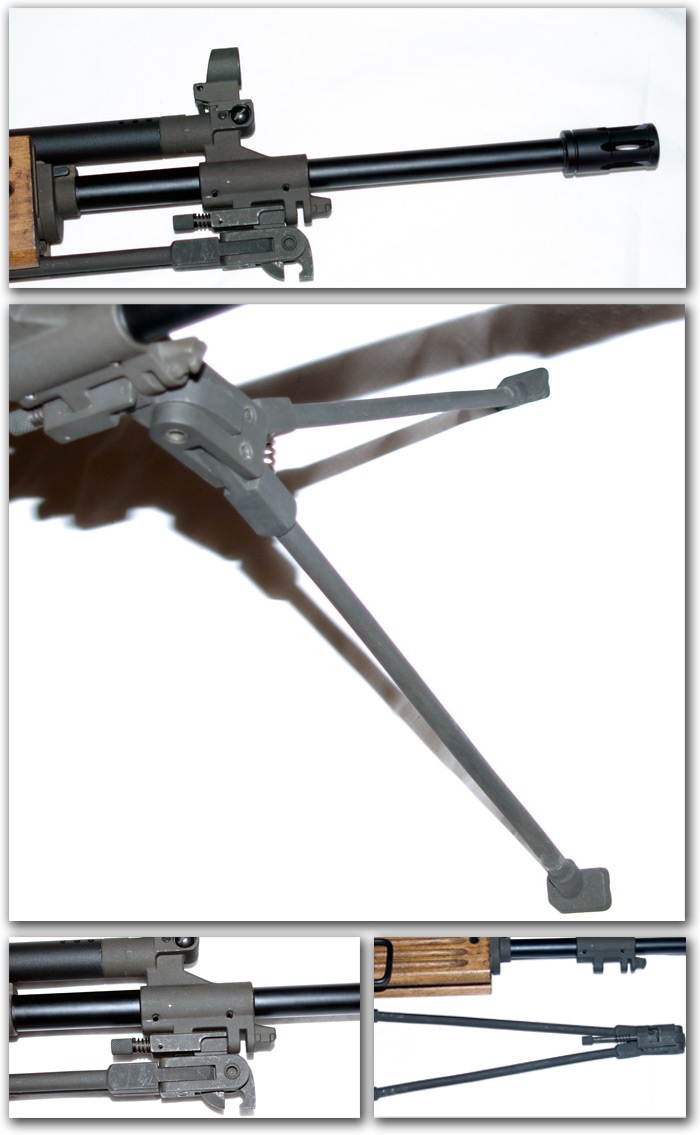
The ICS Galil ARM is a full metal AEG but amazingly quite light. The flash hider is similar to the M4/M16 “bird cage” style and screws into the outer barrel counter clockwise. The outer metal barrel is deceivingly long taking into consideration that it starts off from the end of the receiver. Its length is hidden underneath the bipod and front sight assembly and the handguard.
The bipod is connected to the front sight assembly and can be disconnected by twisting and pulling out the bipod lock pin located on the top rear end part of the bipod. The bipod legs deploy by simply pushing them together and pulling them out. Folding them is similarly easy. They legs are not adjustable but are almost a foot or 12 inches long when deployed. As I have mentioned the bipod are connected to the front sight assembly, which also serves as a support for the outer barrel. The front sight itself is very sturdy and can be adjusted with a special tool included in the package. Behind the front sight is the dummy gas tube that acts as the battery case. There are two dummy gas tube that came with the rifle, one slightly bigger in diameter that the other and can be swapped depending on what size battery you are using.
The wooden handguard can be removed by pulling a lock out located on the right front part of the metal assembly that holds the handguard in place. The ARM variant also features a carry handle similar to support weapons. It is attached on the right side of the rifle and simply swings out and up to deploy it. It is very sturdy but does not lock in place.
The receiver of the Galil Arm is very similar to the AK receiver. Even the disassembly is the same. The charging handle is located on the right side of the receiver and is spring loaded. Pulling it will give access to the sliding hop-up adjustment again similar to AK AEGs. The fire selector, also AK style, moves smoothly across each fire mode. Placement of the firing modes are also the same as in the AK rifle, “safe” on the op, followed by “full auto” then ”semi auto”. A great feature of the ARM variant that ICS included is a second fire selector switch located on the left side of the rifle above the pistol grip. The two fire-selector switches move in unison with each other as compared to the King Arms Galil series which the left side switch do not function.
Another very good feature that ICS included in the ARM AEG is that all the markings, except for the serial number, are all in Hebrew, can’t get anymore authentic than that.

The magazine well fits the two magazines included very well. No wobble. The only thing that I am concerned is the tube, which is a part of the hop-up assembly, where the BBs enter the hop-up chamber from the mags protrudes quite far out and is in danger of getting damaged if the magazine is not inserted properly. I tried to insert an ACM double AK electric magazine but would not fit so I think that normal AK AEG mags will not work on this. The trigger is also made of metal but the trigger pull is a bit soft for my liking.
The only plastic external part of this rifle is the pistol grip. It is also, for me, the most disappointing part. The plastic material used looks and feels cheap and quite soft. ICS could have used a better material on this. But to be fair, most AK looking AEGs have ugly plastic pistol grips anyway except far a few brave ones who dared use wood as pistol grips.
Another very good feature of this rifle is the rear sight, which has a night sight mode that flips up in front of the normal sight. To use it the two sight modes will have to be placed in an offset position.
The skeletal stock folds towards the right side of the rifle. This feature is the primary reason why this rifle is very light. To fold it, simply push the stock downwards to disconnect it from the locking assembly and simply bend it to the right until it lock in place.

The AEG uses a stick type AK battery and like usual AK AEGs goes on top of the receiver. Simply remove the top receiver cover and install the battery.
Again, the ICS Galil ARM is another superb AEG that is both impressive and beautiful outside. ICS made sure that they captured the authenticity of the original Galil Rifle.
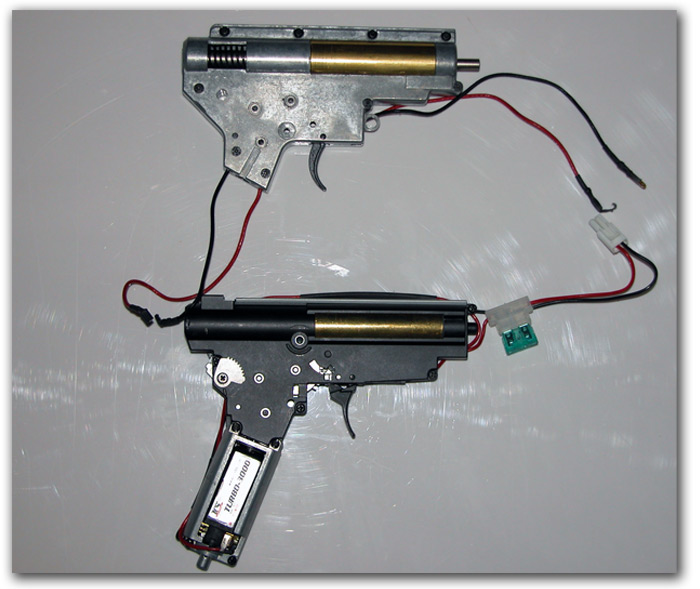
Going Inside
There are no bolts, pins or screws to loosen up or remove in order to remove the top cover of the receiver. Actually, there is no mention of upper receiver, just top cover. We are all used to the term upper receiver which is commonly found on M4/M16 and its variants. We should be thankful to ICS by proving not just a worded take down procedure but with illustrations as well. And it is written in English!
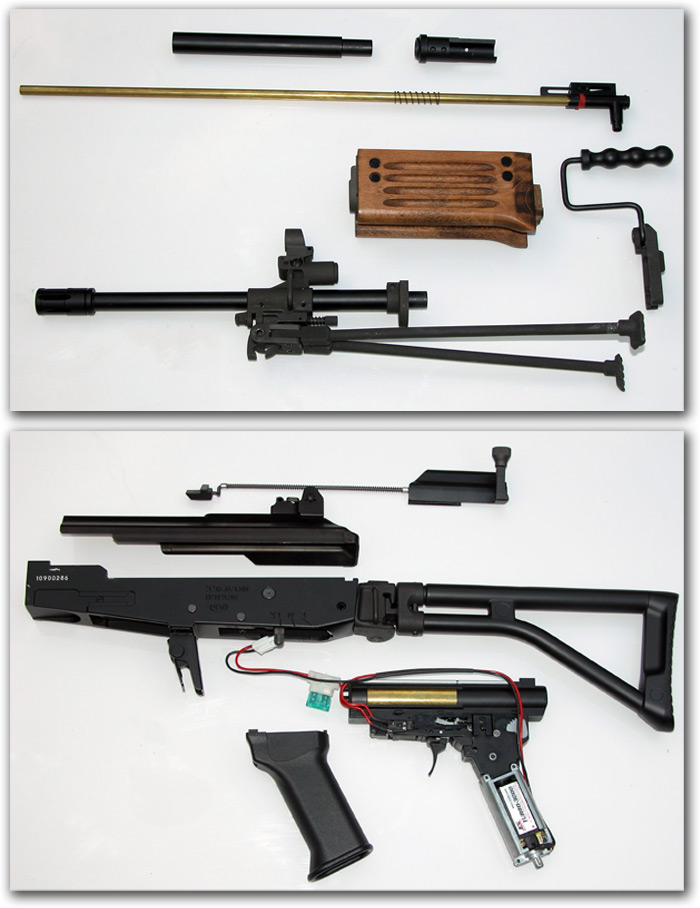
Taken from ICS Website, the procedure is as follows for quick disassembly of the gearbox out of the receiver:
- Press the upper cover button which is located at the top rear of the receiver. This is very prominent so this won’t be missed-out.
- Take the upper cover apart by sliding it backwards until it disengages.
- Unload charging handle set.
- Detach the magazine, pistol grip and the fire selector lever. This includes the trigger guard that is attached to the grip.
- Push hop-up forward and the gearbox with the motor attached can now be taken out of the receiver.
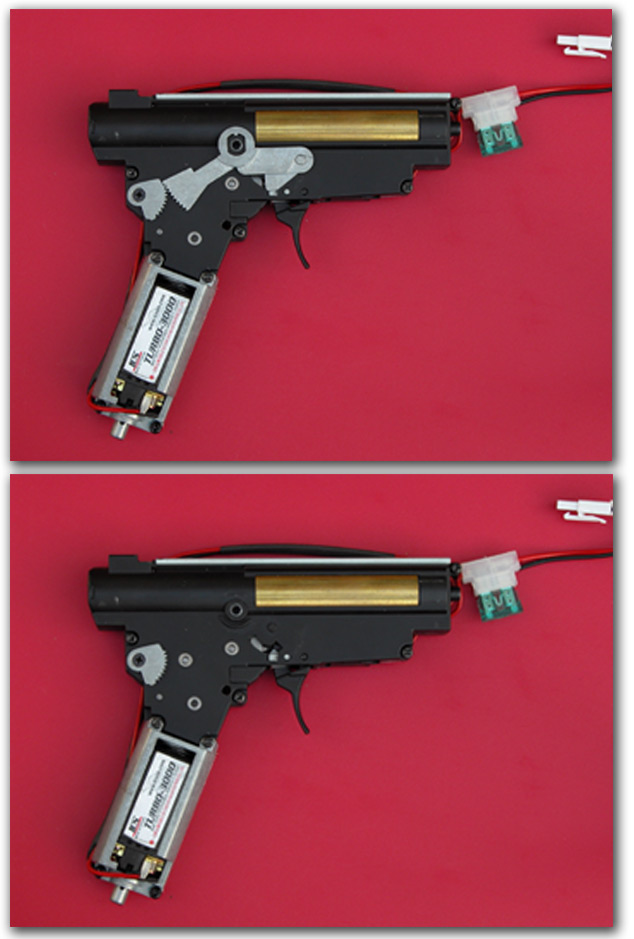
A photo with a G&P M4 gearbox is shown for size comparison. It will be noticed that ICS opted to use an automotive fuse rather than the most commonly used electrical fuse type.
A word of caution in procedure number for when detaching the fire selector lever. A plastic cap is covering the screw that holds everything in place. There are two tabs that hold it to the metal part that it covers. Prising it off with a tiny flat head screw driver is the only way to do it. If you break one tab, it would already pop-out or you may not be able to put it back at all. It will not affect the function but it exposes the screw that it is covering and it loses its real steel likeness.
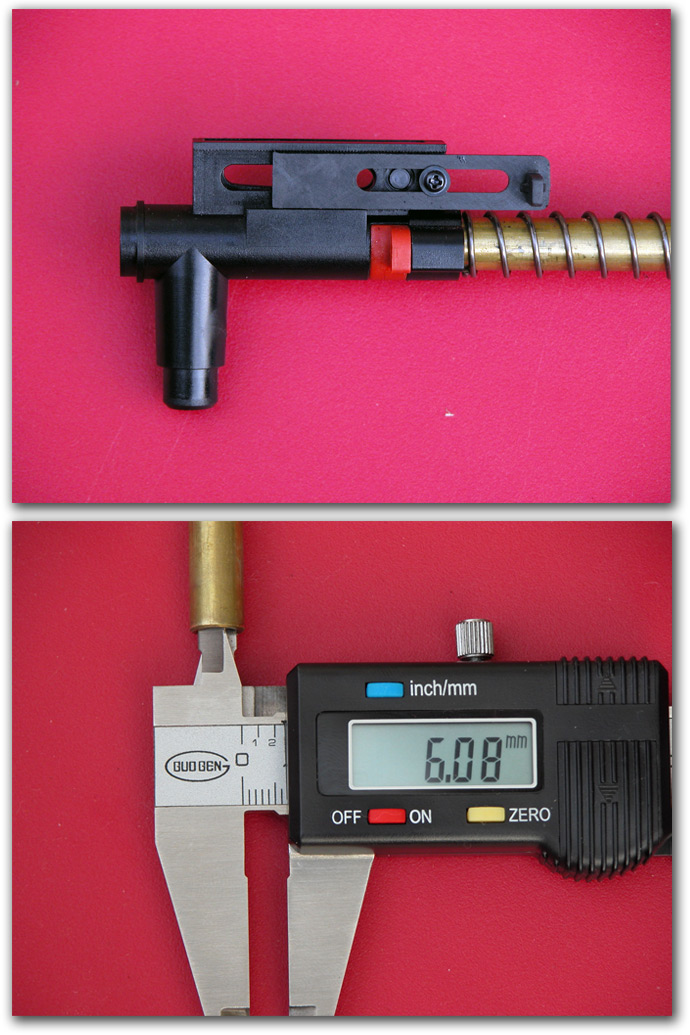
Now that the gearbox is out of the receiver, the inner barrel with the hop-up assembly can now be screwed off for it is fixed on the 3-section reinforced outer barrel. The inner barrel with the hop-up can’t simply be pulled out backwards. The lower part of the hop-up is protruding into the magazine well. The only way to remove the inner barrel is by detaching the 3-section outer barrel. These are held together by grub screws.
The hop-up system is made of plastic which is the sliding type commonly used on sniper rifles.
The inner barrel is made of copper measuring a whooping length of 515mm and an inner diameter of 6.08mm. This length is 6mm longer than the current 509mm length available for sniper rifles. With this length of inner barrel, expect to either be a support weapon or a sniper. Why? Read on. It is on the last part.
Disassembly of the gearbox needs care knowing that the ICS Website data indicated a M120 spring. This would mean a powerful spring rearing to pop-out given a slightest chance to do so. A long screwdriver inserted into the gearbox from the rear is needed to tame the beast spring. Detach first the motor cage from the gearbox before proceeding. The fire selector gears have to be screwed off as well. Take note of the direction of the gears prior to disassembly. Once all the screws and the top sleeve are removed, carefully prise off to separate the two halves. If you were able to control the spring from getting loose, the anti-reversal latch and the trigger parts will not. Take note on how they are attached.
The innards of the gearbox show the parts that ICS are known for. The metal gears with adequate lubrication that looks the business, the nylon fibre reinforced plastic parts and the mighty M120 spring. Other metal parts include the copper cylinder and the trigger group. The other plastic parts are the 15-tooth piston, piston head, cylinder head, nozzle, tappet plate spring, guide and the selector plates.
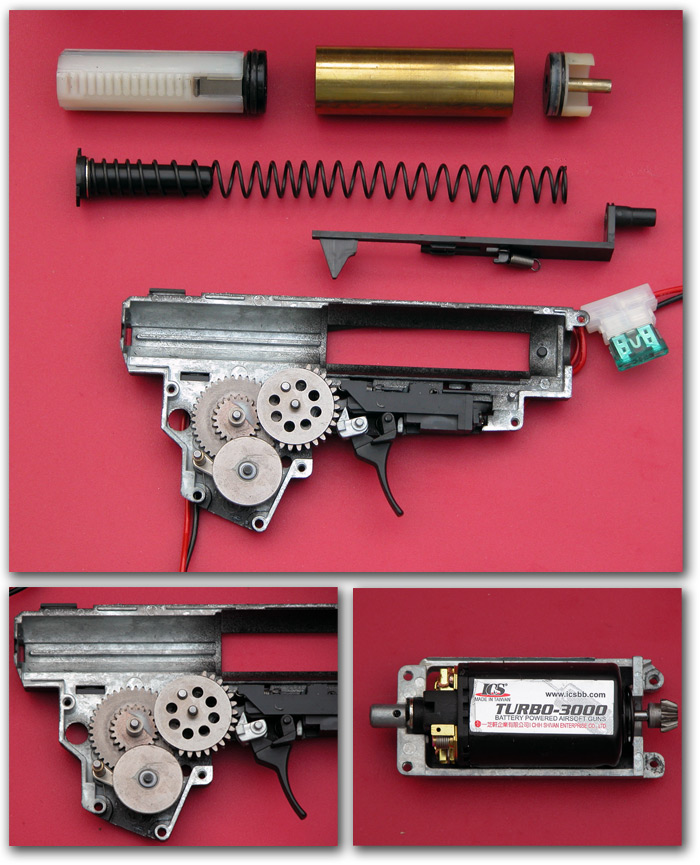
The motor utilised here is the standard short type ICS Turbo 3000 which is a proven workhorse on all its range of AEG’s. An added benefit of having a motor in its own cage is that you don’t alter its pinion to gear engagement unlike on M4/M16s gearboxes where you have to tune it by loosening or tightening the screw by the motor plate.
Putting back the gearbox is where your patience will be tested to the max. There are three things you have to keep in place before you could close it properly: the anti-reversal latch, the mighty spring and the trigger group. You will need all your ten fingers to achieve this if you are alone doing this. I lost count on how many times I tried it before finally succeeding. It only needs technique and patience.
Once the gearbox is closed, it’s all downhill from here.
Test firing the Galil after assembly confirmed the use of M120 spring. I did 10 semi-automatic shots. The chrono readings in FPS are as follows:
396, 400, 403, 415, 413, 404, 408, 397, 406, 394
With 11 FPS difference between the lowest and the highest readings, this is not that consistent in terms of power output. Testing it for range was not that accurate for the prevailing gust was 40 MPH! I tried however. I can only guess it to reach beyond 50M with the M120 spring.
By UK standards, this is a hot gun as a support weapon but could be classed and used as a sniper rifle especially with its folding bipod as long as you equip it with a sniper scope and only set it at semi. Fancy an semi-automatic sniper rifle with this? Why not?
With some tweaking for consistent power output, improving the inner barrel to a tight bore one at least to 6.03, coupled with the hebrew markings, unique serial number, great build quality, and faithfully following the externals of the iconic Galil ARM, the ICS ICAR ARM is one great buy, and for IDF fans to surely want to put in their arsenal. It's one of the best-built airsoft rifles ever made by ICS.